Ultimate User Guide for Wavlink AC600 Setup
Are you searching for the simple steps for the Wavlink ac600 setup? Well, wireless adapters are the best choice that helps in improving wireless connectivity. It is the ideal choice for the service indoors or outdoors. In this blog, we have shared the simple instructions for wavlink AC600 setup. This waterproof or weatherproof wireless adapter is the best solution with which you can go ahead. It helps in boosting the WiFi connectivity. Scroll down from top to bottom and check out the steps for the Wavlink ac600 WiFi range extender. Keep reading.
Simple Guidelines for Wavlink AC600 Outdoor Installation
Look at the below steps for the Wavlink ac600 setup on your device. You just need to complete the steps as mentioned below:
Step 1: The first step is to place the main body holder on the WiFi router by placing the clips into the holes.
Step 2: After that, insert the cable ties into the holes shown at the center of the holder.
Step 3: Thereafter, take 2.4G and 2.5G antennas. Attach the antennas with the extender in the appropriate place on the top of your router.
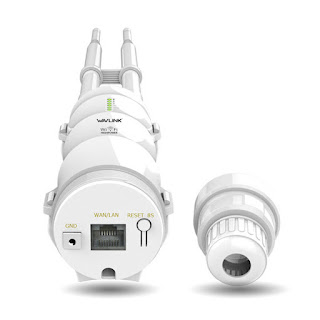
Step 4: Unscrew the plastic cover and the Ethernet which is placed underneath the router.
Step 5: In the next step, plug one end of the LAN cable in the router box and the other end of the LAN cable into the given POE converter.
Step 6: Next, connect the power adapter to the POE converter. Connect your device to the power supply.
Step 7: These are the steps in which Wavlink ac600 high-power extender works as a router.
Step 8: Once the installation process is completed, your router will boot up. Now, you will see that the WiFi and power indicator starts blinking green.
Step 9: Ensure that the Ethernet cable is connected from one end of the POE to the other on the respective device.
Step 10: Launch any web browser of your choice and enter http://ap.setup or IP address 192.168.2.1 in the address bar of the web browser.
Step 11: Now, the system prompts you to enter the username and password. Click on the login button to connect with your router.
Step 12: Enter the router setup interface. Tap on the router wizard to start the setup process.
Step 13: Ensure that you have selected the dynamic IP address.
Step 14: Provide the SSID according to your requirement for both 2.4G and 5G networks.
Step 15: Next, you need to change the security type from Open to WPA2 personal.
Step 16: Enter the password in the WiFi field.
Step 17: Tap on the Apply button to save the changes. It might take some time to initialize and get the router working again.
Step 18: At last, the access point will reboot and you will be able to see the wireless router with which you want to connect.
So, these are the instructions with which you can easily complete the Wavlink ac600 setup on your device and can enjoy the high-speed internet connection.


Comments
Post a Comment